Showing posts with label Design. Show all posts

Tuesday, December 1, 2015

On to the First Track

The first switch I tried, I thought the best way would be to just have the splines fork. This proved to not only leave big gaps, but it was hard to get the right angle.

After talking to Joe Fugate at Train Fest and getting Craig Bisgeier's input, I realized a better way to approach adding switches is to cut a piece from a pine 1x4 and glue it to the spline where a switch is needed.

I got my number one helper Katy to come out to the section house when it came time to put the 45 degree angles on the sides.

Once all the spline was built, it was time to attach it to the benchwork. I put in a 1% grade between Hardin and Parkman. I left the track thru Lodge Grass level. A 48" level with a piece of 3/4" plywood under one end is pretty close to 1%.

The house track at Lodge Grass needed a curved turnout, so I had to make one using a jigsaw and bench sanding wheel. This photo also shows the countersunk screws that hold the spline to the risers. Two generally aren't needed, but I didn't get quite enough glue in this spot and the first screws caused the spines to separate some.

I had tried using latex painters calk on the expansion of my old layout and that seems to make sense for the Masonite splines since it doesn't take spikes at all and I am not adding a layer of cork or Homasote to the top. I forgot to stock up on soup cans to weigh the track down, so I scrounged for everything heavy I could find.

After the calk dried overnight, this was the result.

Thursday, November 12, 2015

Spline Benchwork

The upper deck of the left peninsula is starting to look like a railroad after getting the spline roadbed installed.

Lance Lassen came over and helped me get started. We got the first few splines in and I started to realize I needed more spring clamps.

We also added the n-scale cork on the passing siding in Hardin.


The next day I added more pieces to the outside and extended the length to the end of the peninsula.

A couple days later, Matt Latham came over to help me add more splines.

More spline, more clamps. I got in a habit of adding splines in the morning before I went to work and in the evening before I went to bed in order to give the glue time to dry.

This end view shows the progress of the peninsula.

Wednesday, November 11, 2015

Hardin benchwork and roadbed

I have always admired the sweeping curves created with the use of splines for sub-roadbed. When I got Joe Fugate's original set of DVDs, he presented a way to make spline roadbed from Masonite where you didn't have to put cork on top. With the large new space and the new layout, I decided it was time to try it. 

I found some 1/4" Masonite at the local 84 Lumber since neither of the big box stores stock it. I called around and found a place that would rip it into 7/8" strips, saving me a lot of time on the table saw. Here is what 4 sheets look like cut into strips.


I decided to use 3/4 cabinet plywood rather than the 1/2" I had purchased and luckily Home Depot had some at a reasonable price because I discovered the plywood I had been storing in my pole barn had gotten damp and was delaminating.


It took some time to curve the plywood to fit the backdrop - especially since I couldn't find my belt sander. Of course, a couple days after getting it to fit with saws and a disk sander, my wife found it in a box in the garage that hadn't been unpacked yet a over a year after the move. Lance Lassen came over and we put down some cork and the first splines. Hardin is to Lance's left in this photo. Sheetrock screws are being used to put an s-bend in the Masonite.


This is the first time I have tried spline. The first lesson I learned is to connect the Masonite to the plywood at the start. After reading some of the experiences other people have had, I tried making a notch in the plywood with a reciprocating saw on the third piece, but it looks like I'll need some additional stiffening.


The spline seems to be doing a pretty good job holding its shape with the clamps and sheetrock screws removed.


One more set of splines and clamps. I also want to have the roadbed on passing sidings lower than the main. I am doing this using some n-scale cork.


This morning I took the clamps off and this is what it looked like. It wasn't until I put this photo up that I realized that I have 7 instead of 6. Oops, I guess I got a little spline crazy. I plan on playing around with 45 degree profiles anyway, so I may be routing the first ones.


Tonight, I will work on roadbed for the first turnouts, including my first ever spline. I'll try to remember to take more photos as I go. 

Here are some links that I found priceless when researching spline roadbed:


Leave a comment if you can think of some others - especially videos.


Friday, June 26, 2015

Back to testing deck heights.

With some valence lights up, I decided to put the temporary shelving units back on and see how comfortable things were with the decks at the planned 45 and 64.5 inches.


The upper shelf is 18" wide and the lower is 24". The Valance is roughly 24" wide, but varies some around the curve. I cut the Masonite to 9" strips, which seem to cover the bulbs the way they hang. I don't have a feel yet for how deep the upper shelf will be. You can see that I have several pieces of 4" foam leaning against the wall. I'm not sure if I will use that as benchwork, or save it for scenery.

I also haven't figured out a good way to connect the valance. For these two pieces, I just used roofing nails to connect the Masonite to the 2x3 joists I built the valance with. I'll probably go back to screws, but this was quick and the screws I had were too long. The problem is butting the pieces together. I think I need a good, solid piece to stitch them together. My first thought is to use a 6" wide piece of Masonite and glue the pieces with Liquid Nails, but I had very poor luck getting the rough side of Masonite to stick using Liquid Nails on my old layout. Let me know your thoughts.

Saturday, January 3, 2015

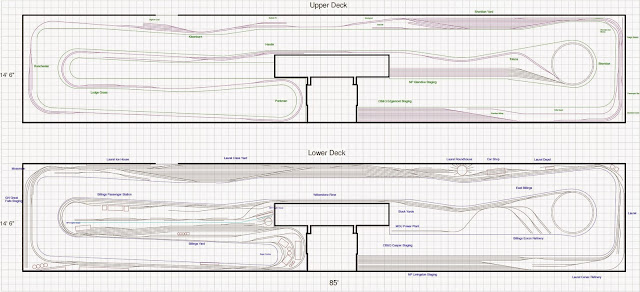
Track Plan

I worked on this double decked track plan to present at the Spring 2014 LDSIG/OPSIG meet in Tulsa. Click on the image or download a high resolution pdf.