Wednesday, August 16, 2017

A construction update

I've spent most of 2017 adding benchwork to the southeast wall of the section house. It's been a slow grind. Other other things have sucked up my hobby time. Also, because much of the time I'm working on the layout by myself, there's a limited amount that I can do a few hours a week. Anyway, I thought I'd share some progress photos.

So in March I went to Tulsa for the LDSIG/OPSIG weekend where I was asked to present. Of course, I took the opportunity to operate too, including on one of my favorite layouts, Jim Senese's Kansas City Terminal.

Bernie Kempinski was the featured speaker and I was able to get him in a selfie while he was selling some of his great books.

I also operated on Steve Davis' KCS which I first saw when it was in about the same stage my layout is now.

Tom Fausser has a new layout based on a waterfront warehouse district in New Jersey.

By the end of April I had brackets up and the beginnings of an upper shelf.

I needed to remove the track from the section of spline the was completed because the latex caulk didn't work well. You can see the track has come unglued here.

I had a few folks over for a work session including Matt Latham here with Eric Mumper behind him. Did I mention that you can never have too many clamps?

Things were starting to get messy as I added spline.

After the work session I stuck this piece of curved Masonite backdrop in to help give the illusion of a backdrop. This piece was from my old Camas Prairie layout and it's been held together as a curve for the last 14 years or so.

Sometimes you forget to read the fine print in eBay auctions.

With the track in, by the end of July it was time to add some paint to the valence and backdrop.

 I told TJ about how much fun painting was and he couldn't wait to help.

One of the dangers of painting track above your head.

 My resistance soldering iron is my absolute favorite tool for adding drops.

 In August, I started adding foam base scenery.

Unlike most of the US, 2" foam isn't easy to find in North Texas. This came from a company in Lewisville that makes walk in refrigerators. Foam goobers were everywhere.

It does make a very nice flat surface and is super easy to work with a hot wire cutter of a saw. This section is between Lodge Grass and Parkman and will be rolling hills covered in cheatgrass with the north end of the Bighorns in the distance. Below is the Billings yard.

At the end of the peninsula is Lodge Grass. The buildings below are just being stored, but the Billings freight house and TOFC will be at this end of the yard.

I used small pieces of thin Luan plywood as a screw base for the Tortoises and then hot glued the base to the Masonite spline.

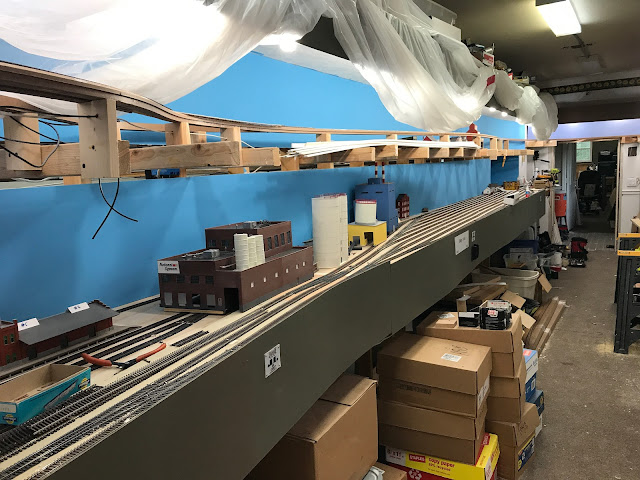
As of August 15, this is the state of the expansion. I spent a couple evenings vacuuming up all the drywall dust and foam goobers before I start removing more drywall to support the lower deck.

I need to build a swing out bridge at the door for emergency egress. The upper deck is wired to the west end of Parkman, which is above the turntable. I still need to add two more Tortoises and more foam scenery to give the area a hilly feel. I also need to figure out how to create some photo backdrops of the distant hills and mountains. I'd like to get back to operating, but I want to have track in along the wall on the right so the trains have some place to go past Billings.

Drop me a line if you are interested in visiting. I work on the layout most Saturdays and Sundays in the afternoon and evening.

Thursday, May 25, 2017

Low Cost Wireless JMRI Signal boards with the ESP8266 and MQTT

I want to use this space to present some work I have been doing, along with Gert "Speed" Muller, on using low cost ESP8266 WiFi microcontrollers to control signaling.


In February on the Arduini Yahoo group I got a little carried away when someone suggested that the European MERG boards were the best solution for CAN based signaling. My experience with MERG 15+ years ago was not great and after seeing a couple consecutive posts where buying boards from MERG was the solution given, I challenged the well meant suggestions in a less than tactful manner. I only mention this because that flame-war was the starting point of this project.

John Plocher mentioned using MQTT with a WeMos D2 Mini R2 board to control signals over WiFi using tried and true TCP protocols. While I had heard of affordable WiFi chips becoming popular recently, I never considered using MQTT to control signals, so there was a big learning curve.

MQTT is an Internet of Things (IoT) connectivity protocol. The IoT buzzword is super hot right now and there is a lot of interest in anything that has to do with connecting things to the Internet. Any time there is a lot of excitement around some technology, there is usually some way to apply it to model railroading.

This isn't meant to be an introduction to MQTT, there are thousands of resources where you can get up to speed on that. I suggest going to Youtube and searching for MQTT Tutorial.

The first thing I had to do was determine if JMRI can be made to understand the MQTT protocol. I knew JMRI has the ability to run scripts and a number of examples are included in every version. Because JMRI is written in Java, the creators cleverly decided to include the Jython interpreter with JMRI. Jython allows Python scripts to be run natively in the Java environment and use the JMRI libraries written in Java. This is amazingly powerful and useful in a way that is probably not obvious at first glance. Some basics of Python scripting in JMRI can be found at JMRI: The Python/Jython language.

The MQTT library for Python is called Paho and is from Eclipse. I set an initial goal of getting the library to load without errors, which turned out to be harder than I expected. Here are the steps I had to take to get there.

Many of these steps involve the command line and editing files. I will add a prompt before the command and use a Courier font. $ for MacOS, > for Windows and % for Linux. If text is added or edited, I will use blue.

Starting with MacOS.
  1. Download latest jython installer from http://www.jython.org/downloads.html
  2. $ java -jar jython-installer-2.7.0.jar to install jython in ~/jython2.7.0
  3. $ ~/jython2.7.0/bin/pip install paho-mqtt
  4. Copy /Volumes/Macintosh\HD/Applications/JMRI/python.properties to ~/Library/Preferences/JMRI
  5. Add the following to ~/Library/Preferences/JMRI/python.properties python.path=~/jython2.7.0/Lib/site-packages                                                            python.startup =
  6. Change lines in ~/jython2.7.0/Lib/site-packages/paho/mqtt/client.py file from listensock = socket.socket(socket.AF_INET, socket.SOCK_STREAM, socket.IPPROTO_IP) to listensock = socket.socket(socket.AF_INET, socket.SOCK_STREAM) as discussed here.
  7. Add import paho.mqtt.client as mqtt to the top of a generic python script
  8. Run script and look for errors in console
  9. After script runs, check that the python.path is correct under Help -> Context...
In Windows.


  1. Download latest jython installer from http://www.jython.org/downloads.html
  2. > java -jar jython-installer-2.7.0.jar to install jython in C:\jython2.7.0
  3. > C:\jython2.7.0/bin/pip.exe install paho-mqtt
  4. Copy C:\Program Files (X86)\JMRI\python.properties to C:\Users\username\JMRI\
  5. Add the following to C:\Users\username\JMRI\python.properties (had to escape out backslashes and dash with JMRI version 4.7.2 )
  6. Change lines in C:\jython2.7.0\Lib\site-packages\paho\mqtt\client.py file from listensock = socket.socket(socket.AF_INET, socket.SOCK_STREAM, socket.IPPROTO_IP) to listensock = socket.socket(socket.AF_INET, socket.SOCK_STREAM) as discussed here.
  7. Add import paho.mqtt.client as mqtt to the top of a generic python script
  8. Run script and look for errors in console
  9. After script runs, check that the python.path is correct under Help -> Context...
In Ubuntu 16.04.
  1. Download jython-installer-2.7.0.jar
  2. % java -jar jython-installer-2.7.0.jar and install jython in ~/jython2.7.0
  3. % ~/jython2.7.0/bin/pip install paho-mqtt
  4. Copy <JMRI_FOLDER>/python.properties to ~/.jmri/
  5. Add the following to ~/.jmri/python.properties python.path=~/jython2.7.0/Lib/site-packages                                                            python.startup =
  6. Add import paho.mqtt.client as mqtt to the top of a generic python script
  7. Run script and look for errors in console
  8. After script runs, check that the python.path is correct under Help -> Context...
So, the key to these instructions is that you have to install Jython. then you have to install Paho so Jython can find it. The reason for editing the python.properties is described here, at first it wasn't right, but I posted a note to the JMRI Yahoo group and it was updated. Thank you to the editor. Basically, you have to install the full version of Jython that can have libraries added to it. The standalone version that is shipped with JMRI can't be extended like this.

I found a bug pop up in the paho library, luckily some Google foo found a solution as noted above. We'll get more into the Python code for handlers, etc., later but any of the examples in the Python Examples directory can be used to test that you have installed everything correctly.

Next time we'll talk about the ESP8266.

Wednesday, March 1, 2017

A New Year, a New Post

It seems like most of my model railroad projects haven't really been out in the section house. After the Plano train show in January, I traded some unsold locomotives and freight cars for some Walthers, Rapido and Balboa passenger cars. I am starting to build a pretty decent North Coast Limited and Mainstreeter, but I need dome cars for the NCL and more baggage car or mail storage cars for the Mainstreeter.


My next big project is to add benchwork along the southeast wall. This will allow me to have train continue past Billings and add the Sugar Factory on the lower deck and add Parkman, the top of the grade, on the upper deck. This is what it looked like at the beginning of February.


The blue backdrop is all that remained of Shane's layout, I took it down and salvaged what I could.


You might remember the trouble I had finding studs with the stud finder. At some point over the winter I removed a chunk of drywall and discovered the reason is because the 5/8" sheetrock is offset from the studs by 1x4 material, adding 3/4" of air in most places. My solution was to buy some 5/8" plywood, screw it to the studs with more 1x4s and attach brackets to the plywood where needed. Removing the 9" wide strip of drywall with a circular saw was a horrible, messy ordeal, but it made for nice clean edges. Oh, and did I mention the mud daubers in the wall? Luckily it was winter, but not a very cold one.


With the first strip of plywood up, I was ready to add brackets and fascia.


I started by adding heavy duty shelf brackets upside down and attaching pieces of 1/2" plywood underneath with short screws that still poke through, but they can be ground off.


By the end of February I had the fascia extended around the new section and the bottom painted white. I could finally stack some junk on top of it and get it up off the floor.